 Let’s face it, disposable dog pee pads are gross. Call it a pee pad, training pad, puppy, pad, Wee-Wee pad, their sole purpose is to serve as an indoor bathroom for your dogs, absorbing any urine that your weak-bladder’d pup might need to let out throughout the day. Because of its less than glamorous function, not much thought was put into the original look – a more clinical appearance that mirrors the bed pads commonly used in hospitals and nursing homes. Not only do these unsightly pee pads lay out on your nice wood floors and stylish carpeting, but it also has a few irritating flaws.
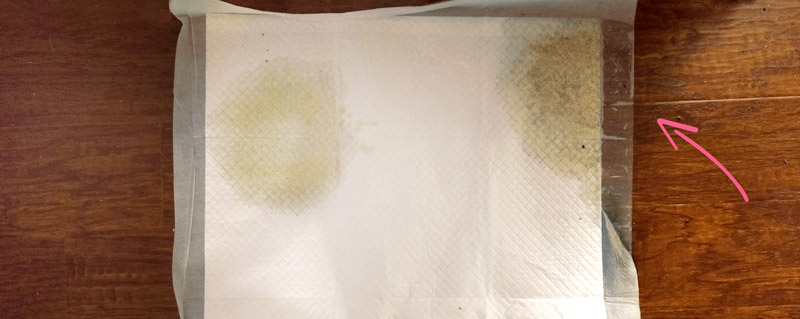 For me at least, my dogs don’t always aim towards the middle of the pad, but rather near the blue border where the absorbent material ends. Many times I’ll go to pick up the wee-wee pad and find a bunch of urine sitting underneath – not so great for my floors, nor my sanity.
Then there is of course the environmental issue. Once your dog pees once or twice onto the pad, it’s time to throw it out and replace it with a new one. For those with multiple puppies, small dogs, or seniors – this can be multiple pads per day.
After years of caring for my older, incontinent dogs, I felt it was time to find a better product – one that was reusable, could hold in liquids better, and will stop anything from leaking off the edges. After shopping online to see what reusable pee pads already exist, it seems like the latest designs simply swap out the disposable material with a washable one, and while more eco-friendly, it doesn’t seem like enough to solve all of my issues, so I decided to get out my sewing machine out and make my own… and I’ll share with you how I did it 🙂
1) Make a cute design that will be a lot more pleasant to look at in my home.
2) Find the right fabric for strong absorbency and an additional waterproof backing.
3) Create some sort of holder/frame to provide walls for the pad so the urine can’t run off onto the floor.
Note that the pads I designed are based on the standard size pad (22 x 22”). I recommend increasing the size if you have larger dogs – between 28” and 35” for the length and width of the pad. Remember for every inch you increase the pad, increase the other fabrics and pipes by an inch as well.
Items you will need:
For Pee Pads:
- 23” square piece of cotton (with a design printed on it)
- (2) 23” square pieces of flannel
- 23” square piece of polyurethane coated nylon
For Frame:
- 43” square piece of vinyl
- 25” piece of vinyl (accent color)
- 60” elastic cord
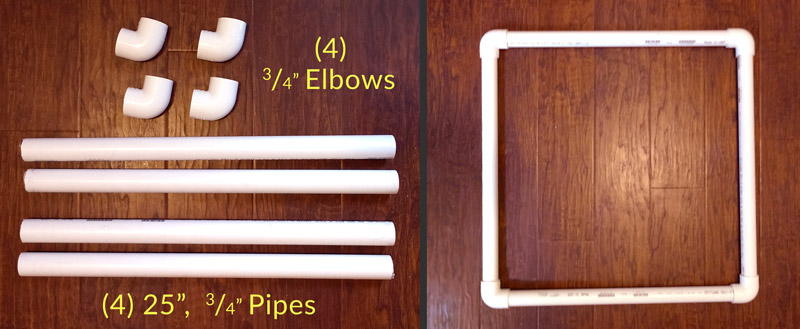
- (4) 22” long – 1” pvc/abs piping
- (4) 1” pvc/abs elbows
Making the Pee Pads
The first thing you will need to do is assemble the layers of the pee pad. There are four layers total (From top to bottom: 1 layer of cotton, 2 layers of flannel, 1 layer of nylon). Each one should be cut down to 23” x 23” (assuming they will be trimmed down to about 22” x 22” after sewing together).
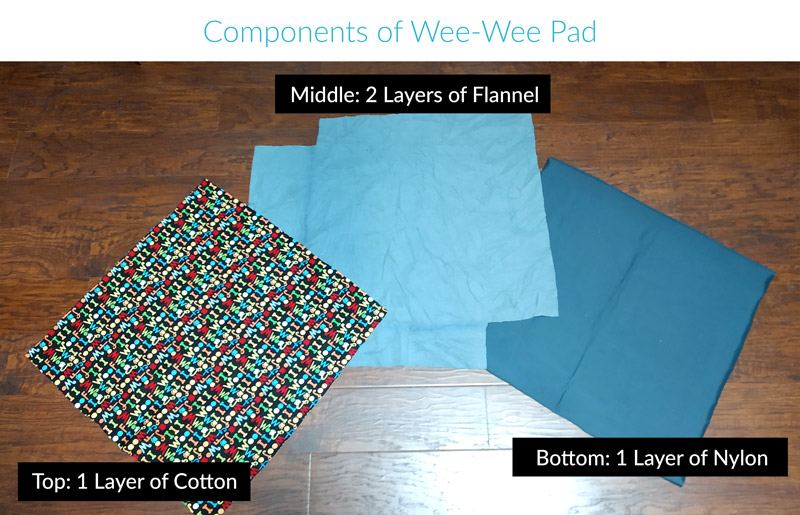
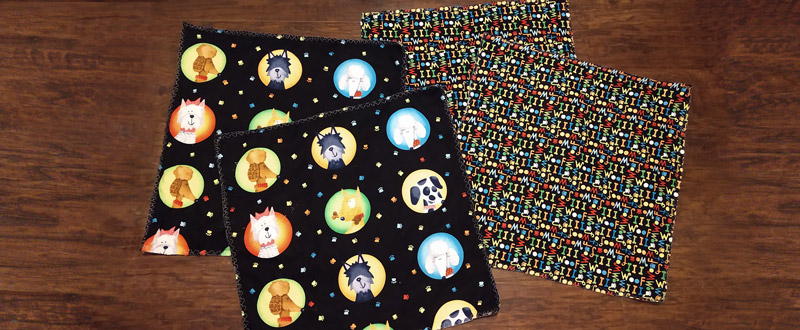
The cotton won’t absorb much, but will be the top layer that everyone sees, so pick out a cute fabric! (Dark colored fabric will be better at concealing urine markings from afar).
The two layers of flannel serve as the absorbent material. It has a soft, slightly fluffy feel to it while still remaining quite thin. Other retentive fabrics, such as cotton sherpa, may be more absorbent but are also a lot thicker; You don’t want your pad to get too cushion-y because your dog might think you made him a bed rather than a bathroom.
The bottom layer is the water-proof liner, which uses the same fabric as our ‘heavy duty’ reusable dog waste bags that we sell at our online store. The nylon should be around 150-200 denier and needs to have at least one side coated with polyurethane so that water cannot seep through; The coated side should face upwards.
Once you have all the layers cut to size, stack them and clip together. It’s okay if the edges don’t line up perfectly as you’ll get another chance to trim them down.

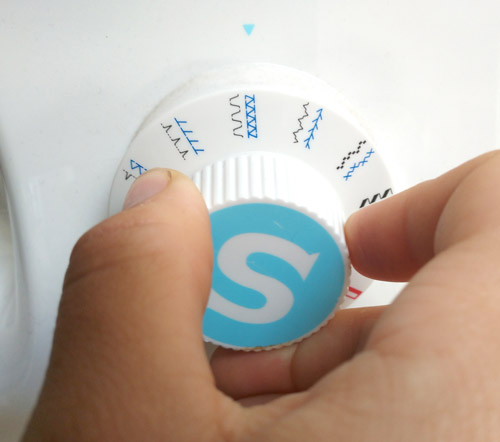 You can use a standard presser foot for the first stitching. I have a Singer sewing machine and chose the stitch pattern called Rampart that looks like this.
Line up the right edge of your foot close to where the fabric ends and ensure that there will be at least a ¼” – ½” padding to the edge. Proceed to sew all the way around the border, keeping the padding intact.
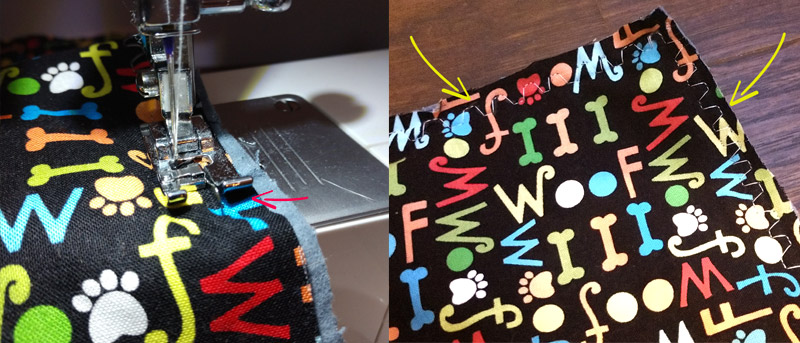
Your squares should now be one united piece. Trim the edges of any excess fabric (again, still maintain that padding).
You’ll now want to switch to an overcast foot – a great tool to get as close to serging an unfinished edge without owning a serger. Keep the rampart stitch selected and align the foot so that the center metal bar is directly on or even slightly past the edge.
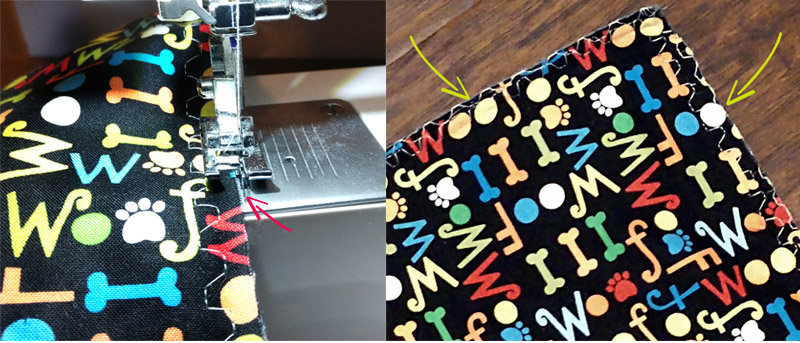
*Important* Be very careful if you have never used the overcast foot before as if not used correctly, your needle can hit the foot and break apart. Most likely you’ll want to set a width around level 5, then push the pedal gently at first to make sure the needle correctly goes into the empty gaps of the foot. Continue to stitch all the way around to close up the seam.
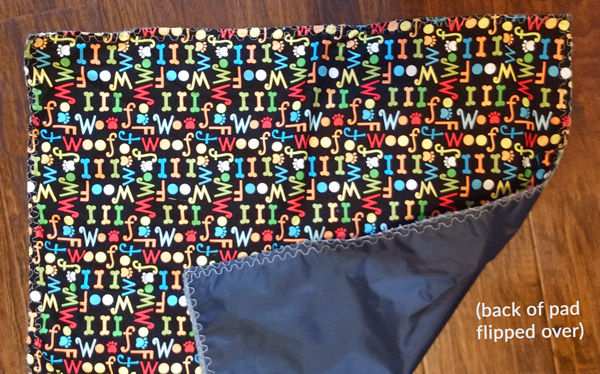
Voila! You have made your first reusable pee pad. I would definitely make a few more so you have backups when you need to throw one in the wash… did I mention these are machine washable? I recommend running a delicate cycle with a low spin; Use standard detergent (no bleach).
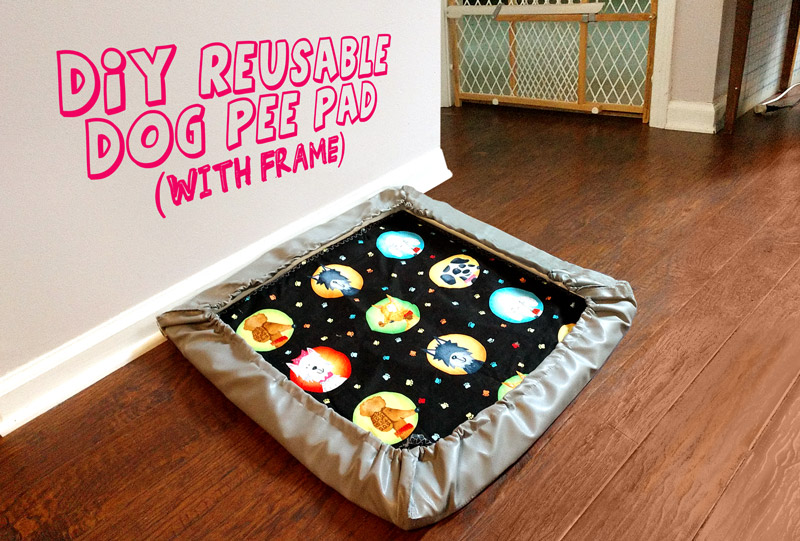
Of course you could just stop here, but if you’re one of the lucky ones like me where your dogs like to pee on the edges, I recommend continuing on to make the frame.
Making the Pad Holder/Frame
The frame is made out of 1” pvc. Cut four equal pieces of 22” pipes and then connect them all with four elbows. In hindsight, I may have wanted to use abs piping instead of pvc as the black color would make the frame more hidden.
I chose a thick vinyl material for the fabric of the frame because it will not absorb any liquid whatsoever and can be easily wiped down if any urine happens to spill onto it. Flannel-backed vinyl is fine as only one side of the fabric will be exposed.
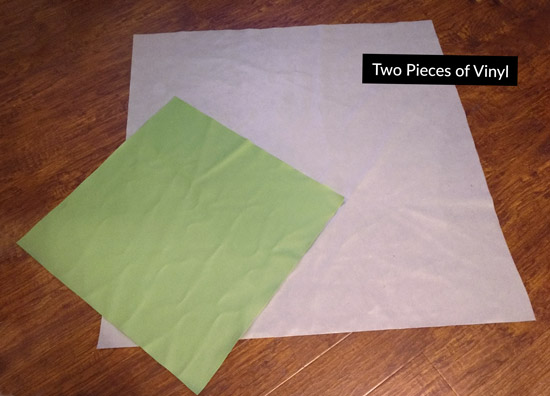
You’ll need to cut two pieces of vinyl – one 43” x 43”, the other 25” x 25”. I used a mute grey color for the large piece and a green accent piece for the small square that will serve as the inner bottom of the frame.
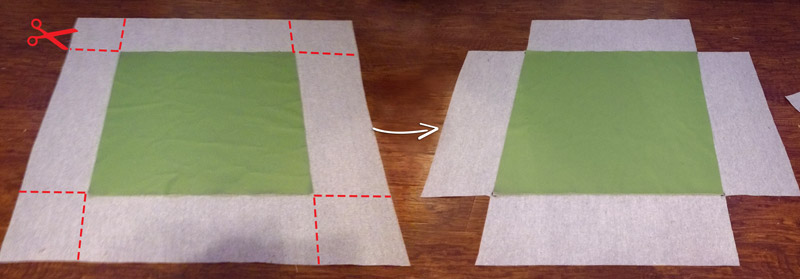
Cut 9” down and inward on each corner of the large piece. You’ll notice that when you place the smaller square centered on top of the larger one, its corners should closely match up to where you made the cuts.
Next, fold each side over like in the image. The folded flaps should just slightly overlap the small square.
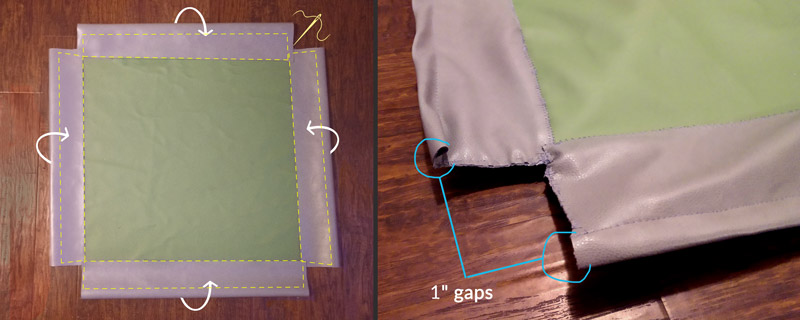
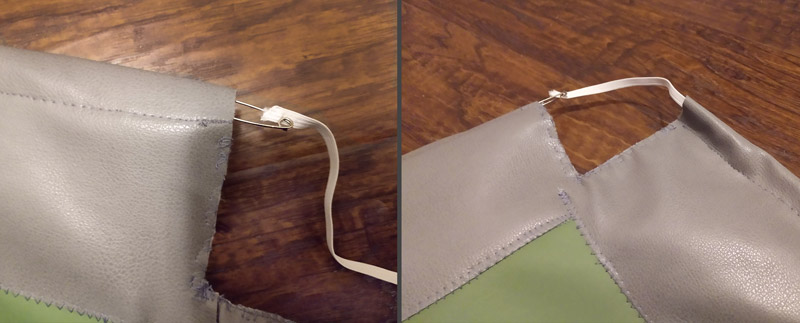
Sew along where the flaps’ edges overlap the green. I switched back to a standard pressure foot and chose a zig-zag stitch with a very small width and length setting. You’ll also want to sew the sides of the flaps but leave 1” alone at the top to make an opening.
This is where your elastic cord comes in. Attach a safety pin to one end and guide it through one of the flap’s openings. Feel the safety pin over of the fabric and nudge it through to the opposite side of the flap and out the other end. Move onto the second flap and push the safety pin through, continue to nudge through until you have run the elastic cord through all four flaps.
You should now have both ends of the cord at one corner. Place your pvc frame centered onto the fabric and then pull both ends of the cord. Like magic, all flaps will rise up and fold over the pipes. Pull as hard as you can until you are satisfied the fabric is as wrapped as it can be and then tie the two ends of the cord into a knot. Trim off the excess of the cord.
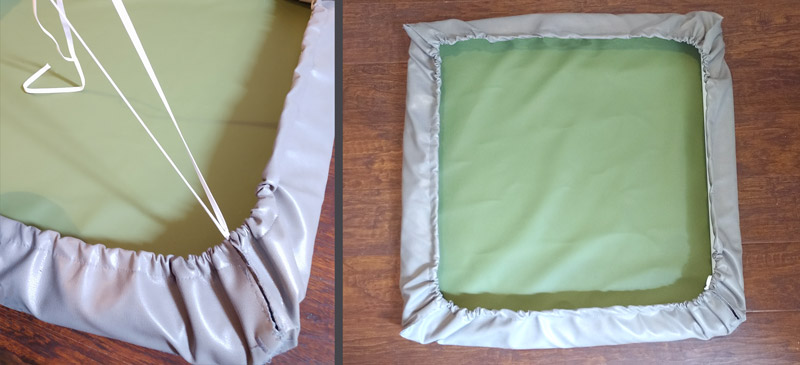
You now have your pee pad holder!

Place one of your pee pads inside the frame and you’re done.
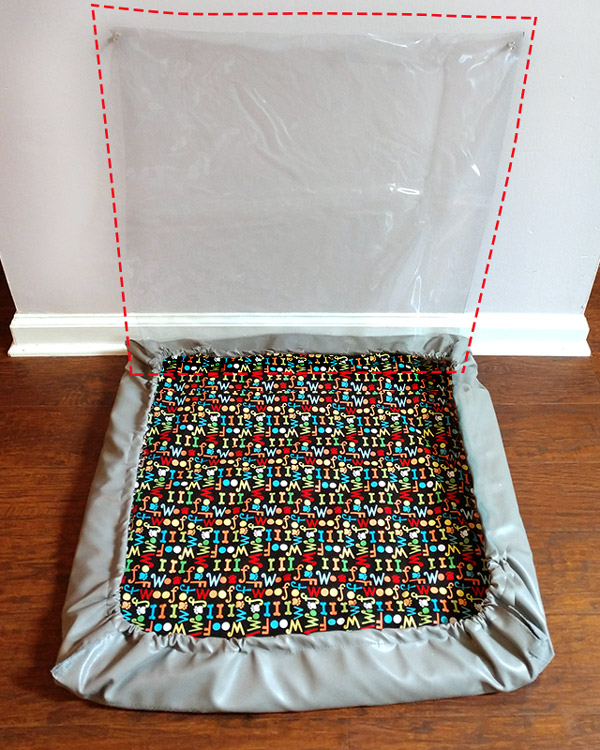
Probably a bit overkill for most, but if you have a boy dog that only likes to pee onto vertical objects, cut a 22 x 20” piece of clear vinyl and thumbtack it to the wall above your pee pad set-up. Now he can enjoy marking his territory without ruining your furniture.
I was concerned about my dogs not realizing that they should pee on my new contraption so I made sure to place it in the same spot I’ve always placed the pads and then threw a disposable pee pad on top. I let them use the disposable one for two days while they get used to the frame, then I removed it.
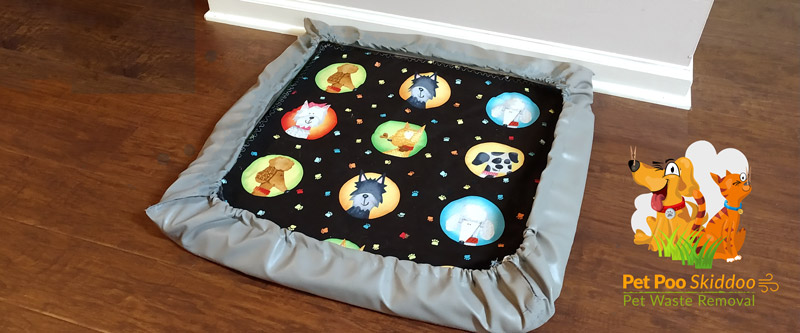
It worked! My dogs are using my reusable pee pads and am so happy that I don’t have to clean up any runoff urine on my floor!